Showing posts with label craft. Show all posts

Saturday, August 11, 2012

More about Lilac...

CRAFTFest is fast approaching.  


I would like to introduce you to some fellow stall holders from my team! Here are a few teamies from Team Lilac. 


The first featured artist is Chiara Stone.

Each of her adorable characters have his or her own story to tell.  For instance, meet George the Giraffe! You will just fall in love with George and his quirks! 
George the Giraffe

Age: 8
Likes: Fluffy clouds and long, wavy grass
Dislikes: Angry people, animals that growl

George is a giraffe who likes to spend lots of time by himself. His favourite hobby is to find smallish trees so he can eat the very top leaf on each one. He has some very strange personal habits, including lying on his back with his long neck and all four legs wiggling in the air.


Next, please welcome to my blog, Cat Barker!


http://creative-connections.ning.com/photo/albums/plusheeze-s-craftfest-stall

It's Gordon the Gorilla!  (I am sensing a theme here... ) Gordon is part of Cat's store Plusheeze's; a place where you can find many adorable hand-sewn friends!  Be careful, though, you may want to adopt all of them!

 Gordan The Gorilla Plushie - With Banana
This cute furry fellow makes an awesome gift, He's beautifully made and so cuddly!
He comes with a bright banana and a whole lot of love!


Finally the dynamic duo of Garreth & Carla Falls have a stall you really should visit.
http://creative-connections.ning.com/photo/albums/scentcosmetics-craftfest

Here, you will find soaps in all shapes and sizes; and the photos make the scents just leap off the page.  Your imagination and what you know will surely have you lingering in this online shop! In keeping with our theme, here are some lovely sheep soap! (I am pretty certain, however, that they will not smell like sheep)

Irish Sheep Soap

Well, there you have it!  Please take the time to browse the items here and also the stall links on CRAFTFest! Each photo should take you to the stall and then the stall should have links to where you can purchase these lovelies.  Until next time, my friends!

Click on! 
~Karen~


Saturday, July 28, 2012

CRAFTfest, dubbed a virtual craft extravaganza!

The Back Story...
As usual, I was wandering the web when I came across an online community for crafters.  This community is a crafter's network called Creative Connections . Always up for snooping in others' shops and getting to know fellow crafters, I ventured "inside". 

Discovery...
This site, after you become a member, encourages you to download pictures, join groups, blog, ask questions in forums and network with crafters near and far.  At last check, there were nearly 1500 members; most residing in the United Kingdom but alas, a few from the United States. There is even a group formed by friends from Etsy in this network!  Posters, flyers, Facebook cover photos, ads, and embed codes are provided by the team! Here is how my album looks!


Find more photos like this on Creative Connections


The Point...

Mostly the site is a place to hang out and make friends, share ideas, and vent frustrations and share success but on the calendar there is the CRAFTfest. The event itself is scheduled for the first week of September and will run the entire week.  During that week (as well as leading up to the week) all the shops signed up (called stall holders) promote, promote, promote!  My team, the Lilac team has begun filling Pinterest boards and the atmosphere is starting to crackle and the online "stalls" (aka photo albums) are starting to come alive.


KK Marie's


The Event...
The week long event in September will be the 5th virtual craft fair for this social network and there is another planned for the end of November.  Depending on how this goes, I may just re-up for the Christmas.  Check it out, maybe it will be a fit for you too!

What do you think?

Wednesday, July 11, 2012

How-To Guide: Canvas Photo Transfer


THIS BLOG WAS ORIGINALLY POSTED BY SERENITY ON THE WEBSITE BOLTINTHEBLUE.COM


How-To Guide: Canvas Photo Transfer

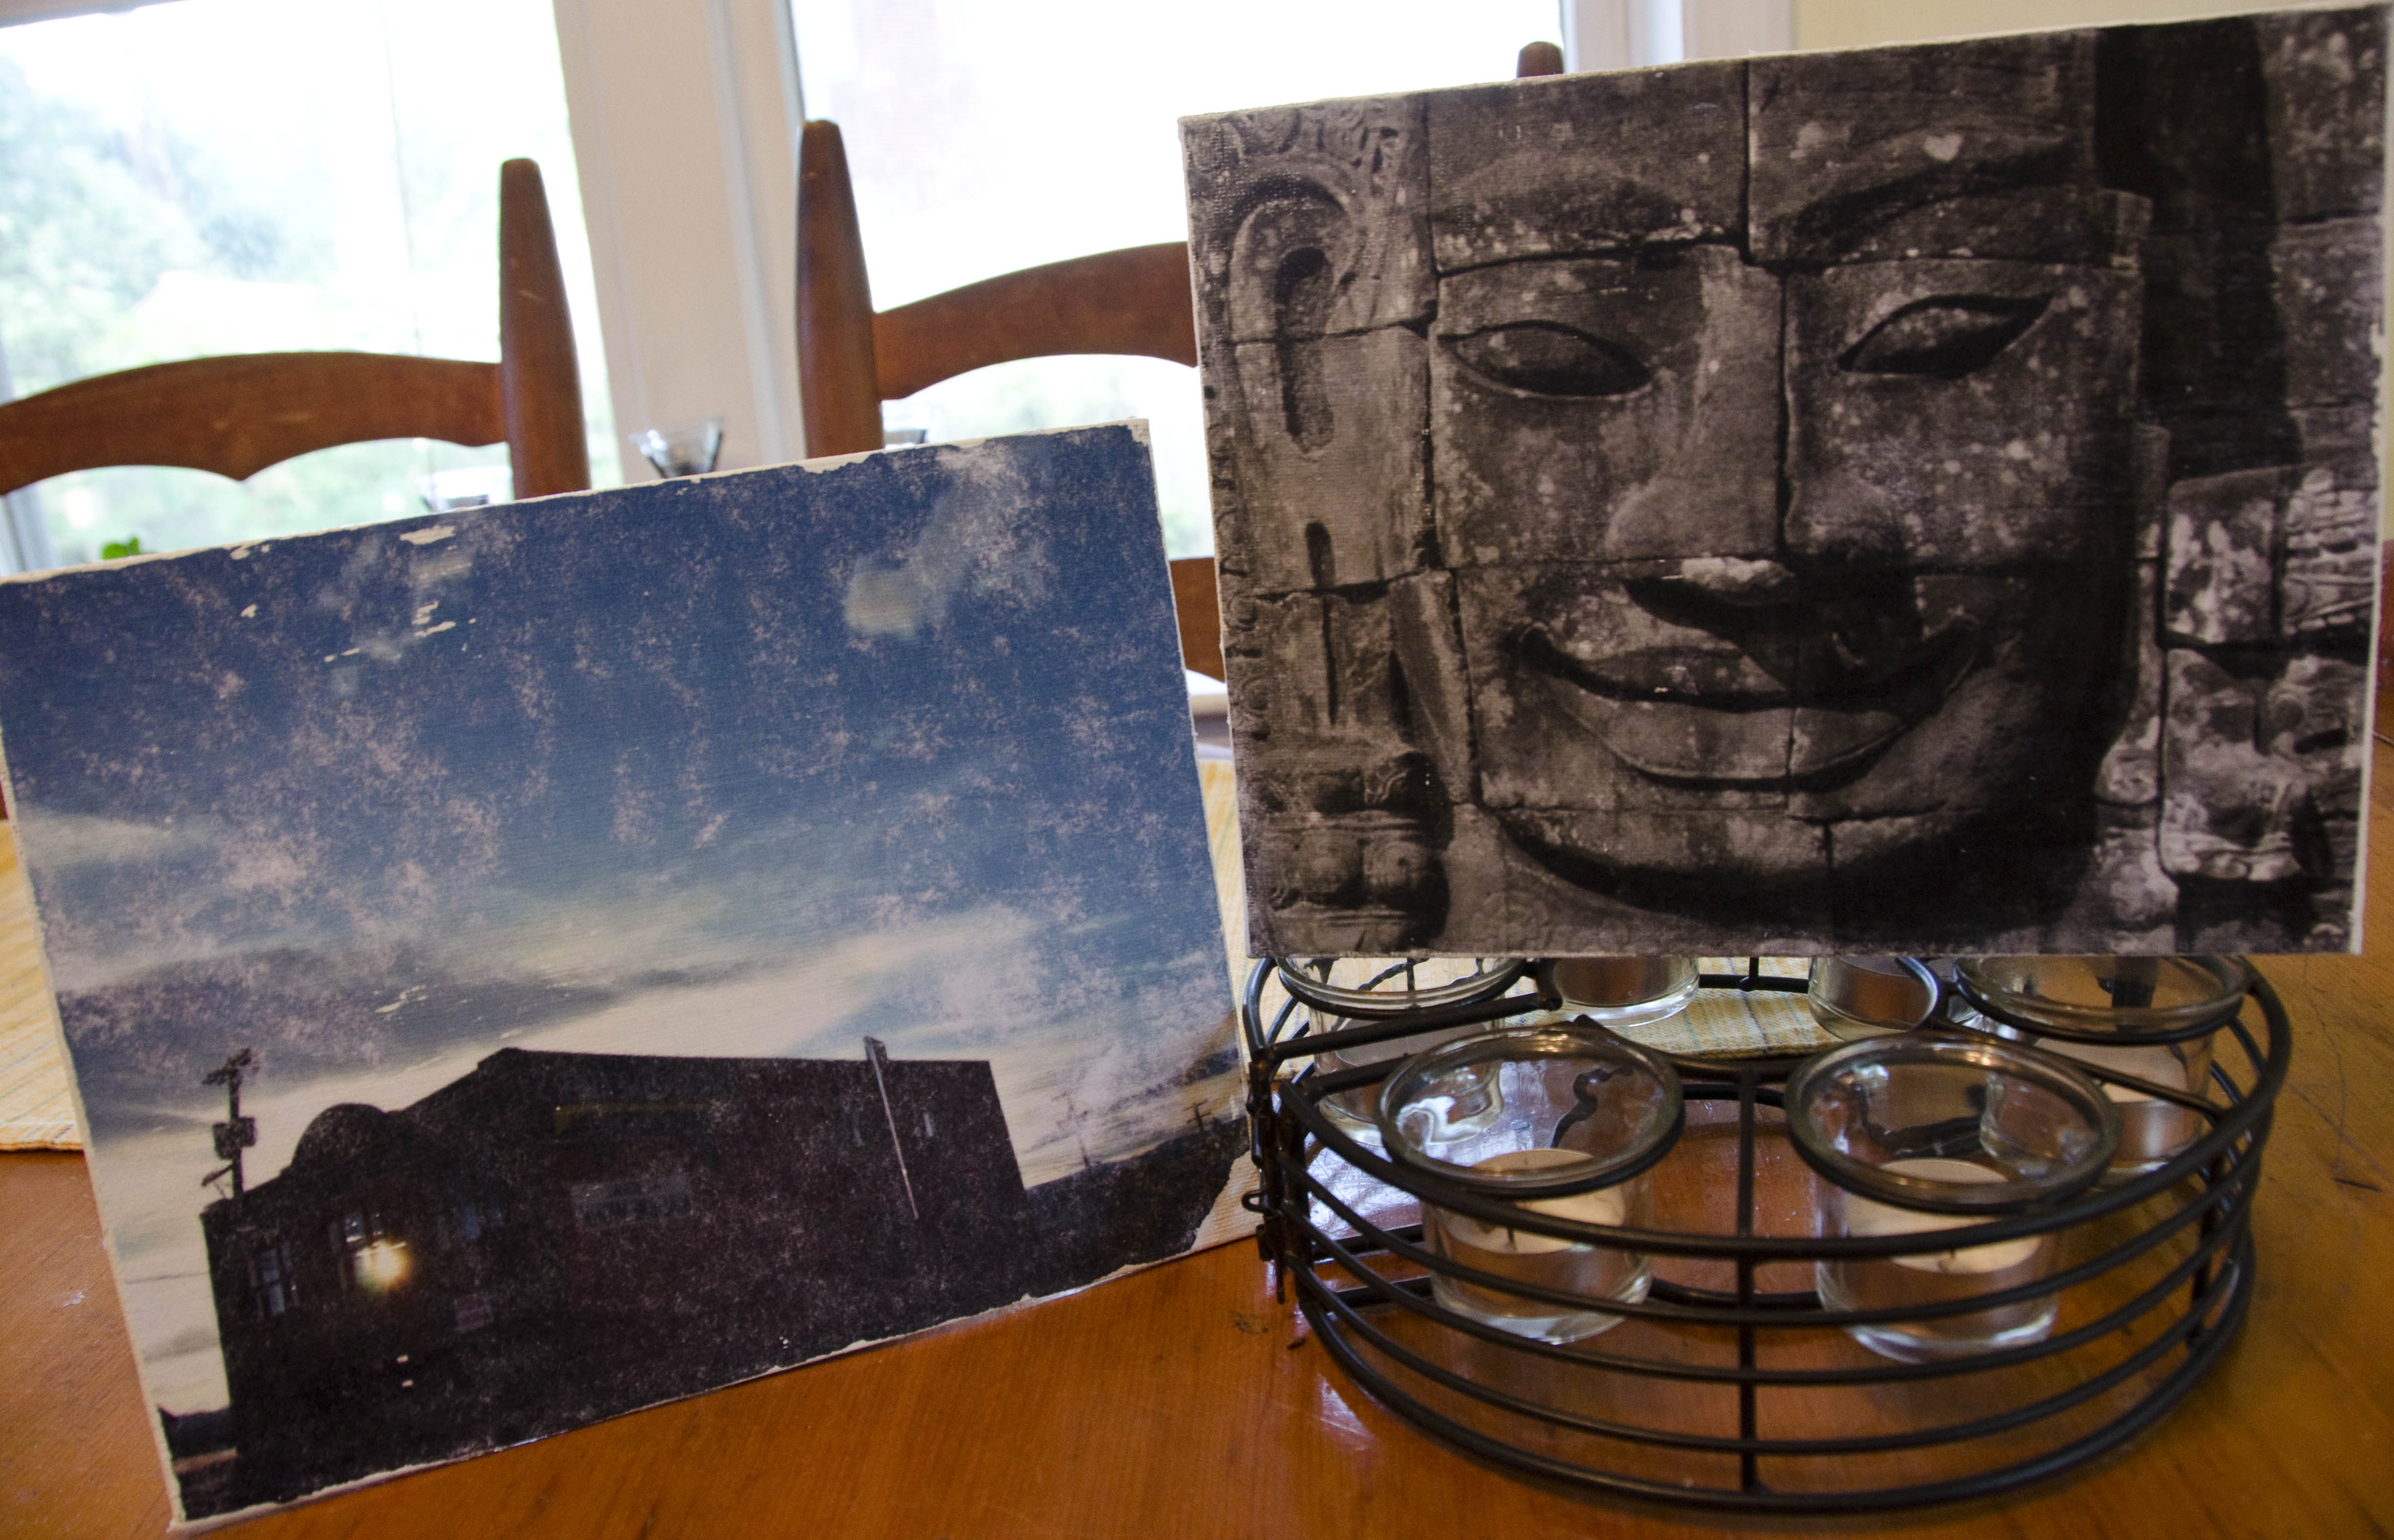
If you’re anything like me, you have a hard drive (or three) of photos waiting to be printed. Take matters into your own hands and do it right at home! Printing onto canvas turns your photos into unique pieces that you can’t get from a print shop. Each transfer is wonderfully and uniquely imperfect, which gives them a vintage look and feel.
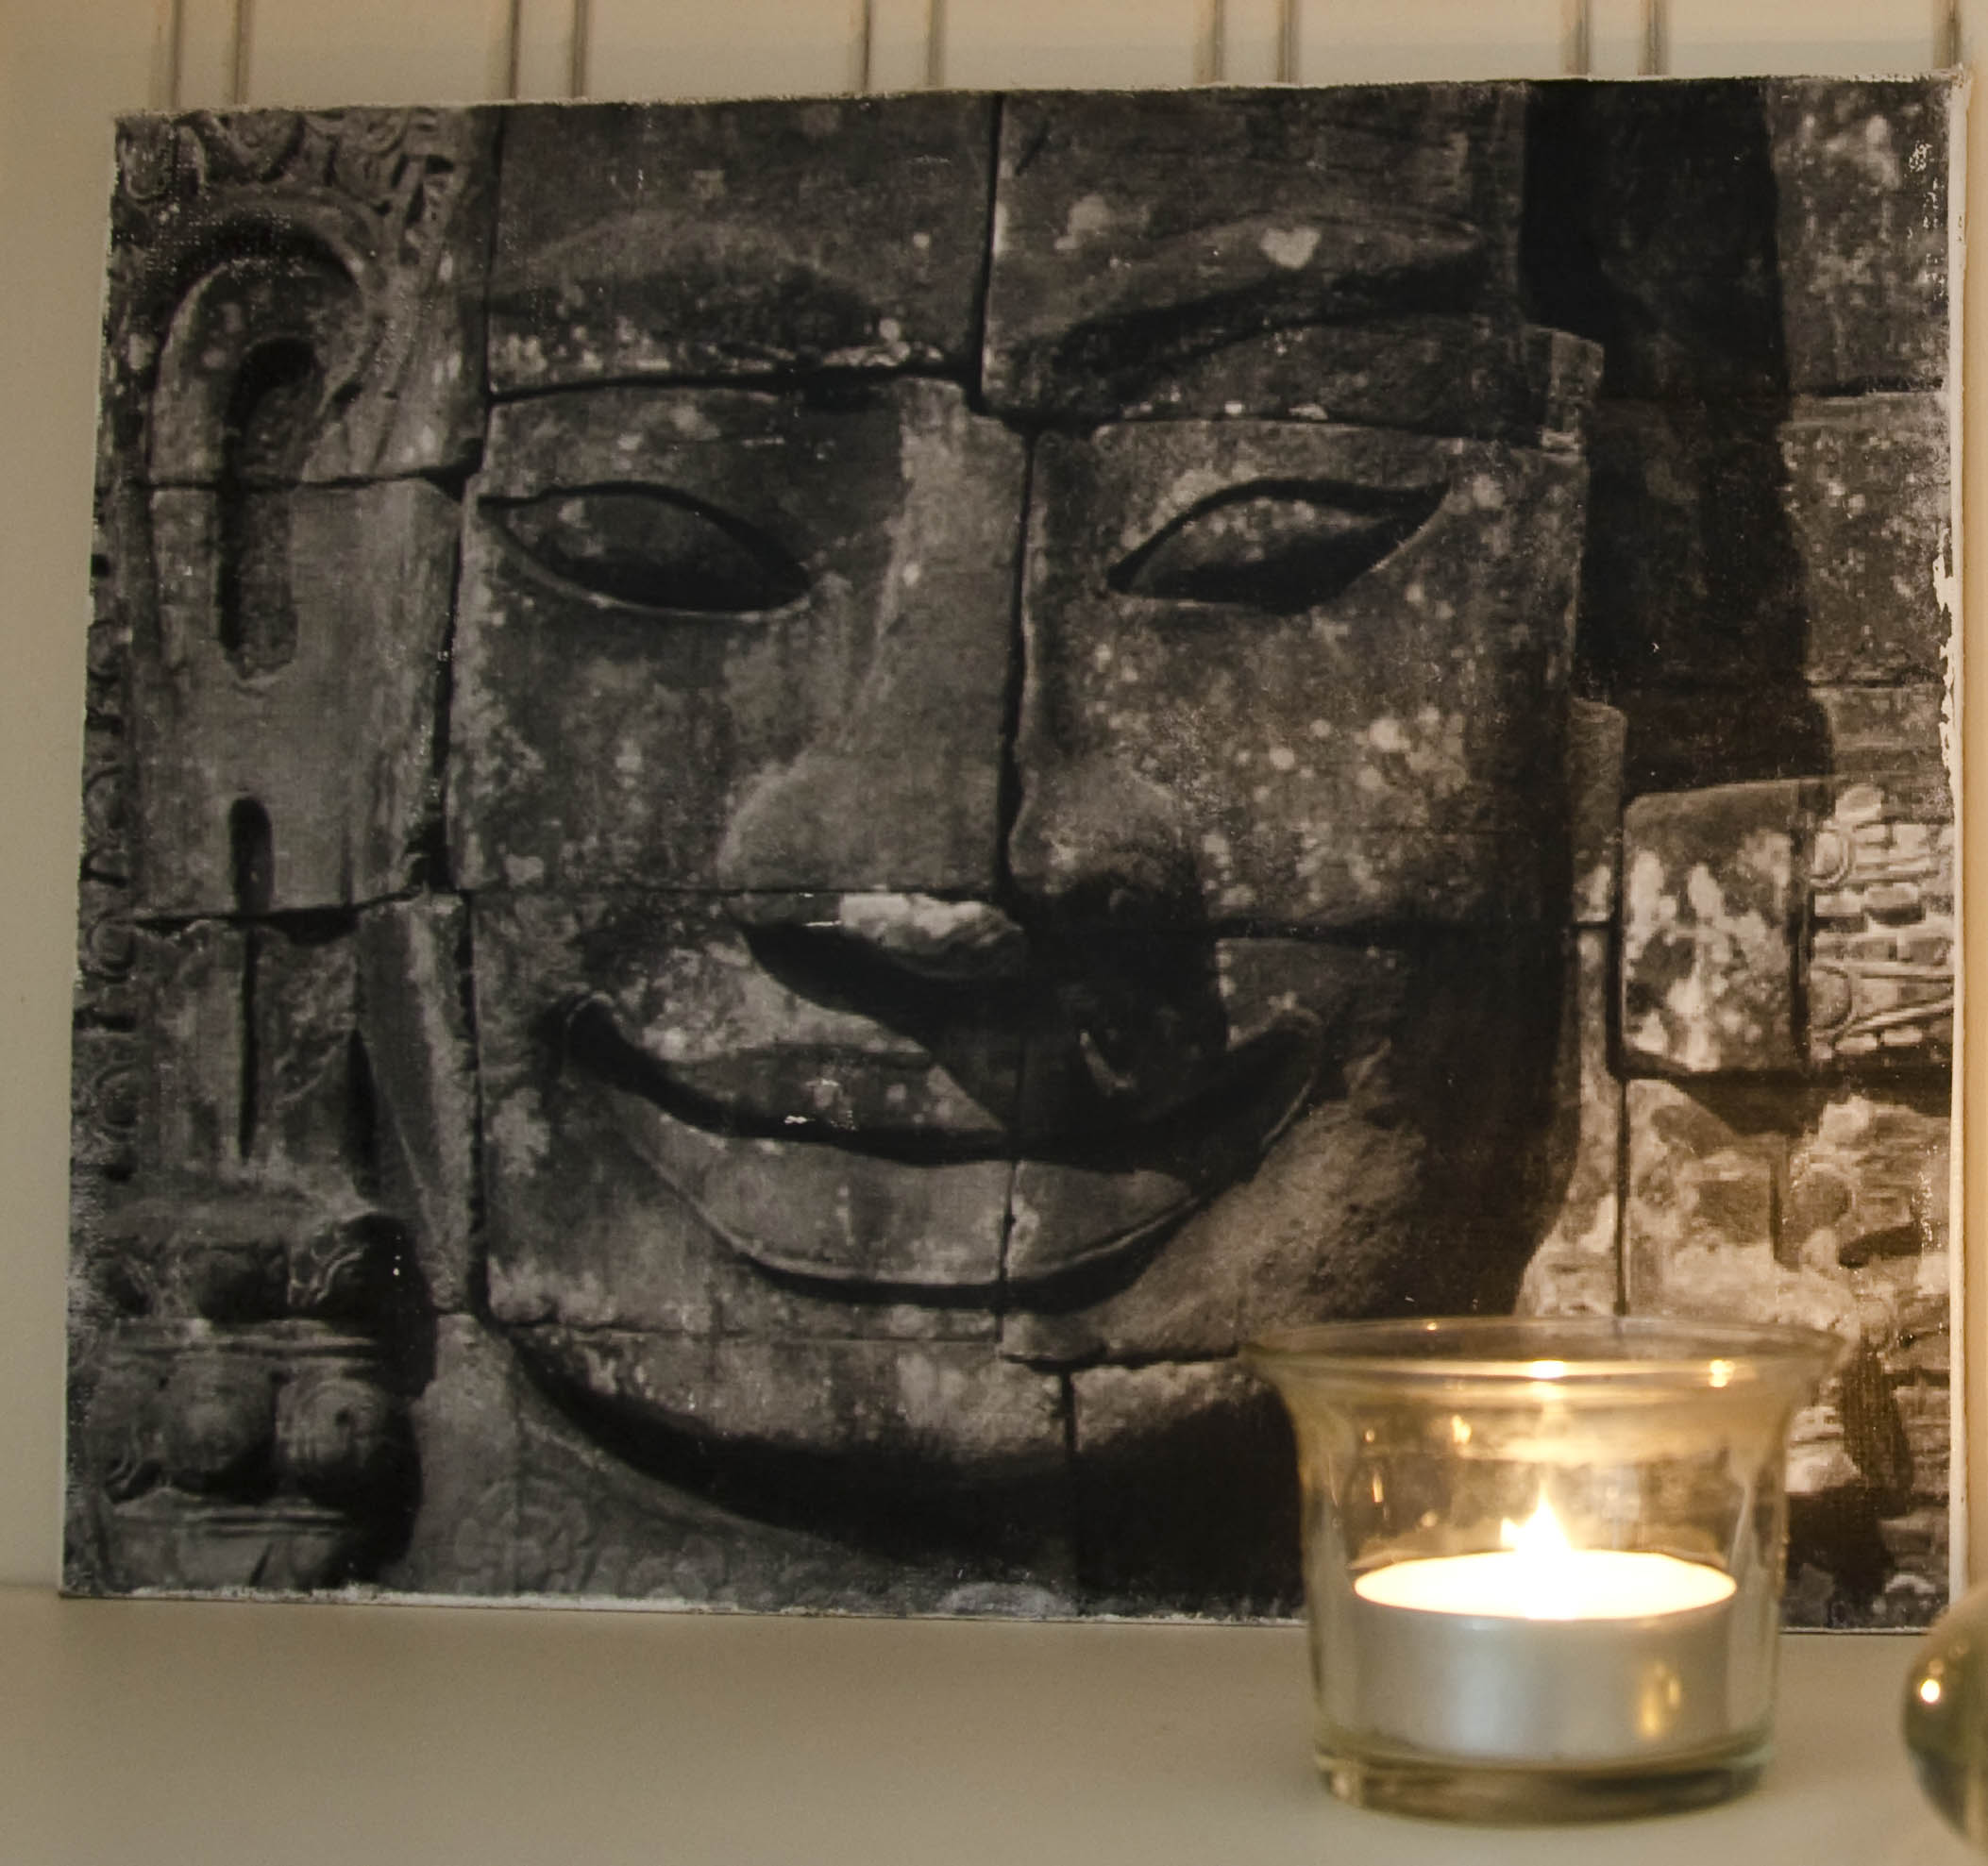
For my first experiment, I used a color print of sunset at the “Sheep Shearer’s Union Hall” in Butte, Montana and a black-and-white print of a statue from Ta Prahm temple in Cambodia. I think it worked equally well for both, although next time I would definitely choose a color print with less detail.
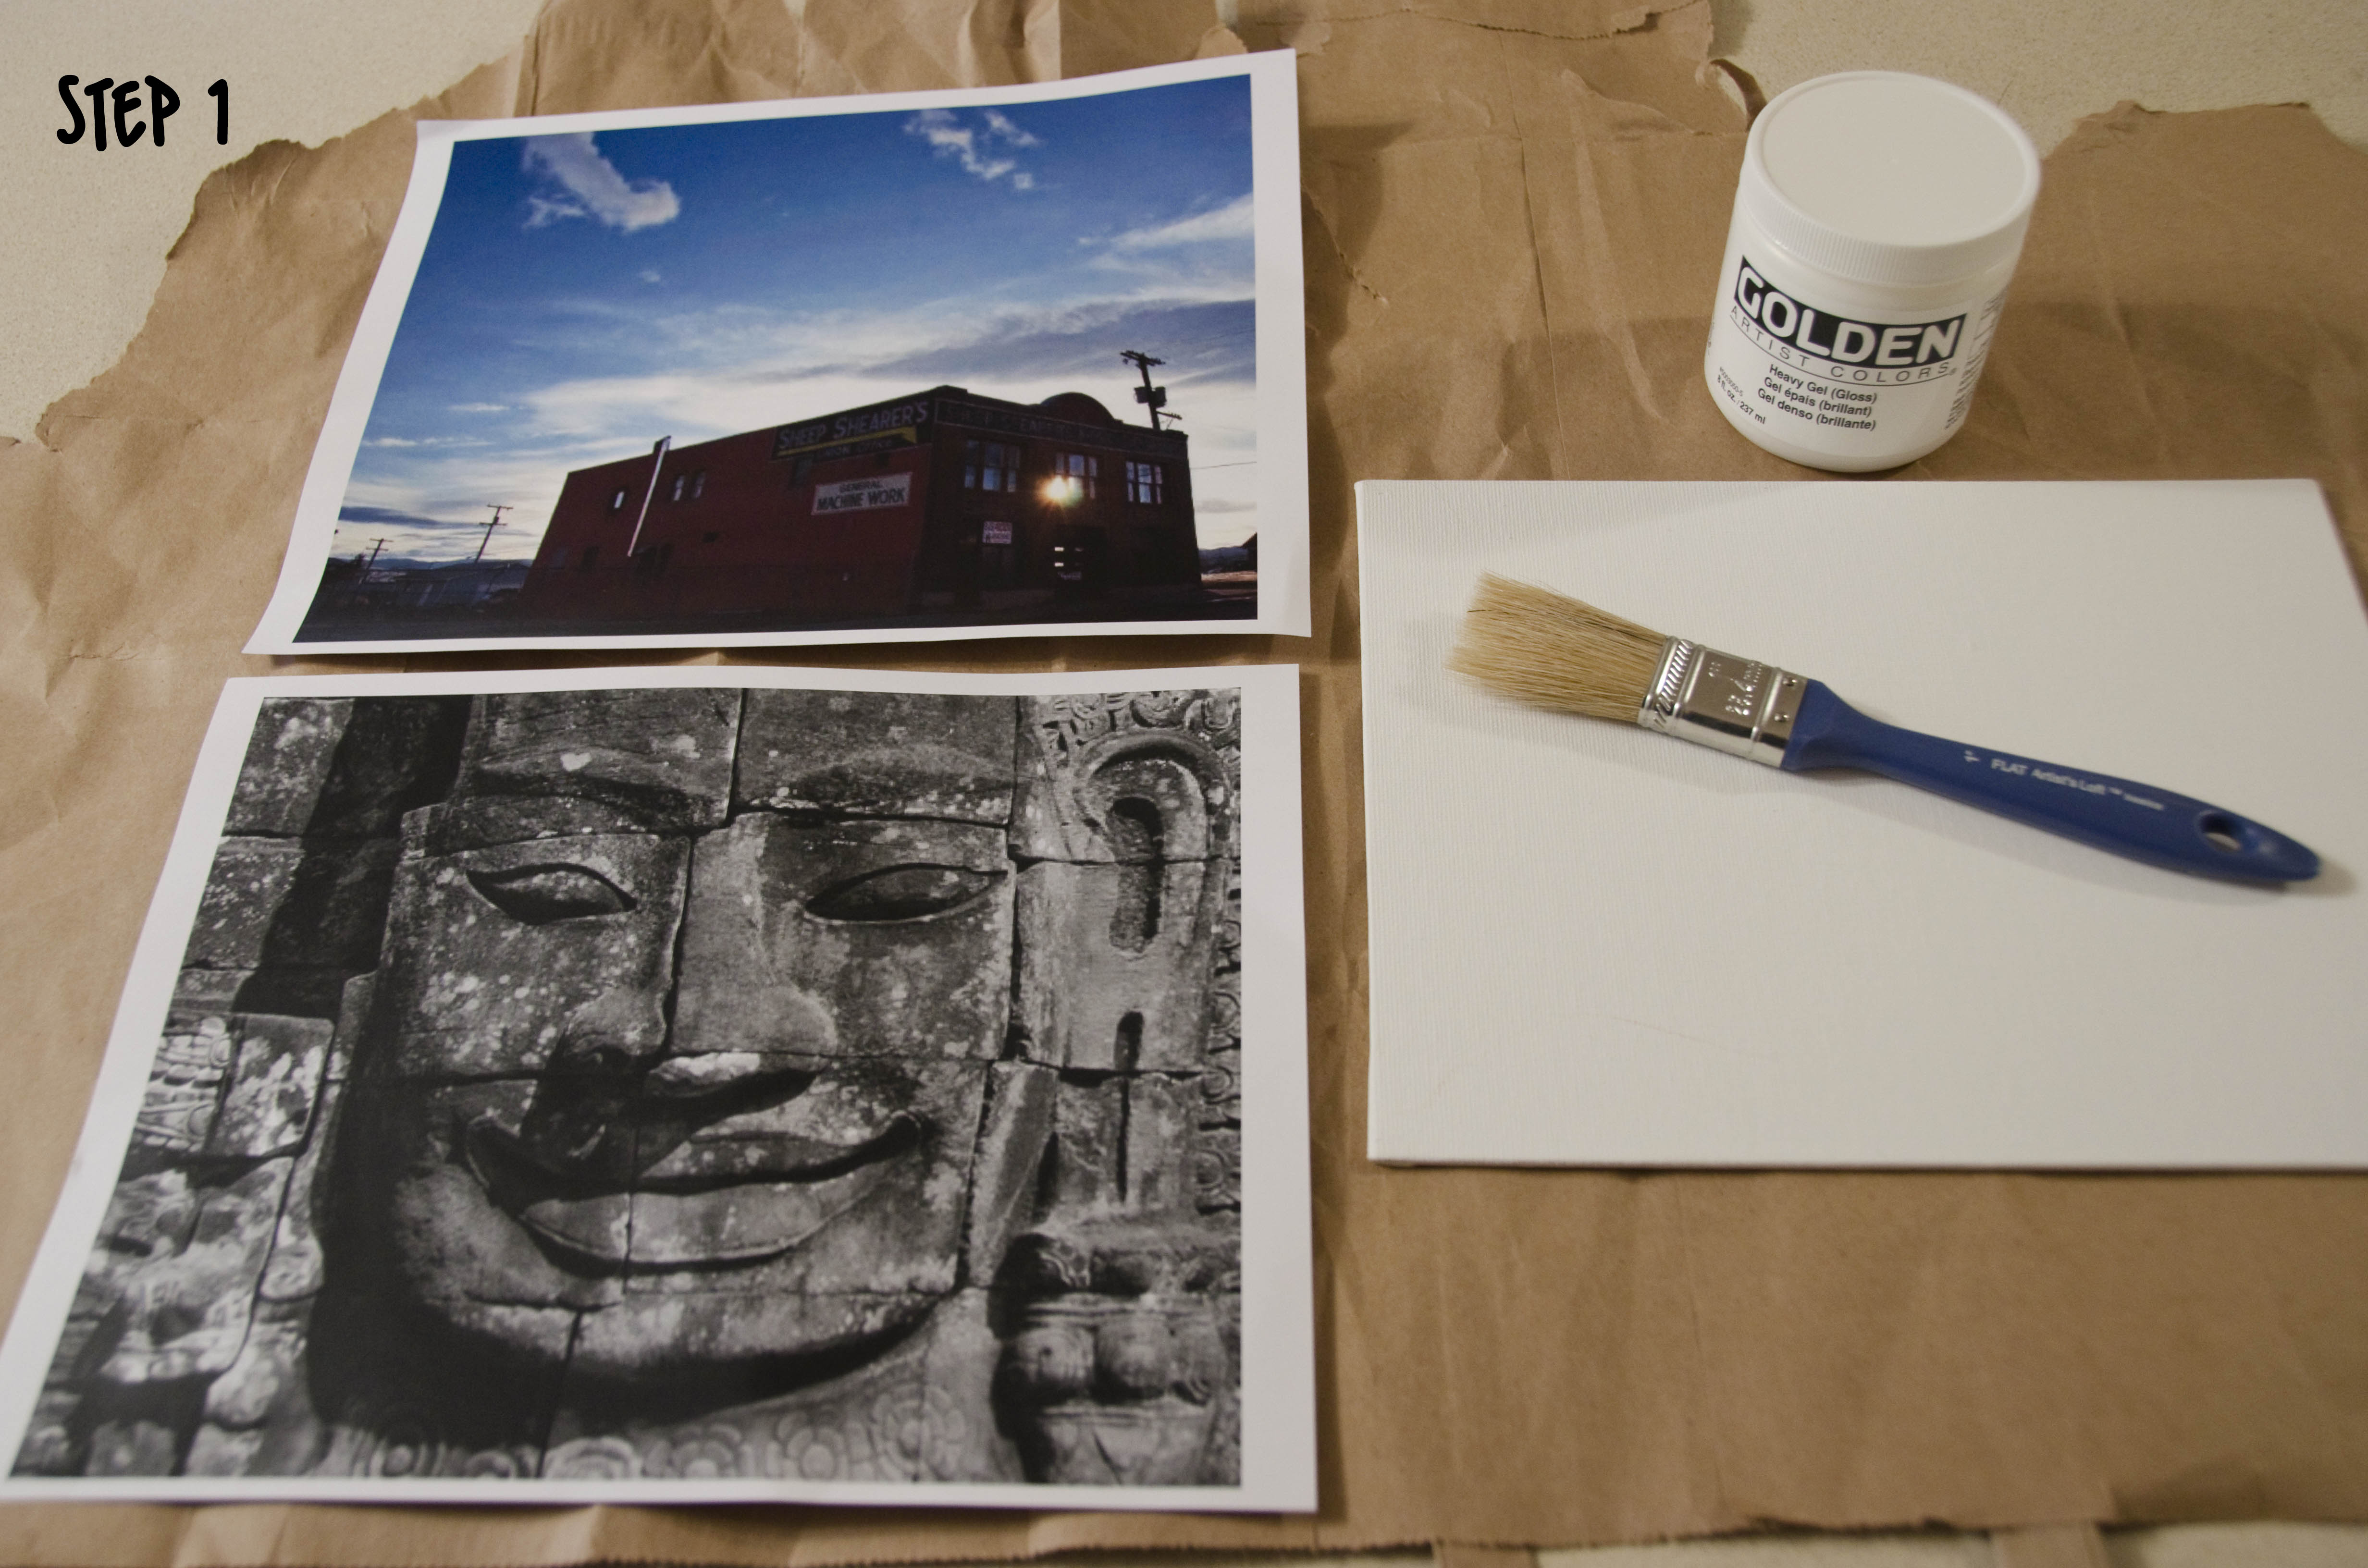
Materials: A laser-printed copy of your photo, an 8×10 inch canvas board, a paintbrush, a jar of heavy gel gloss, and a spray bottle of water. Did I mention that this is really easy?
Step 1:   Print a copy of your photo using a laser printer. This is very important because the kind of ink from an ink-jet printer won’t work. I took mine to a copy shop and had them print out a copy (I just emailed it to myself and printed it from their computer). Remember that your image will print reversed, so if there are any words on it, make sure to print a “mirror copy.” You may notice, if you look carefully at my picture of the “Sheep Shearer’s Union” building, that I forgot to do this.
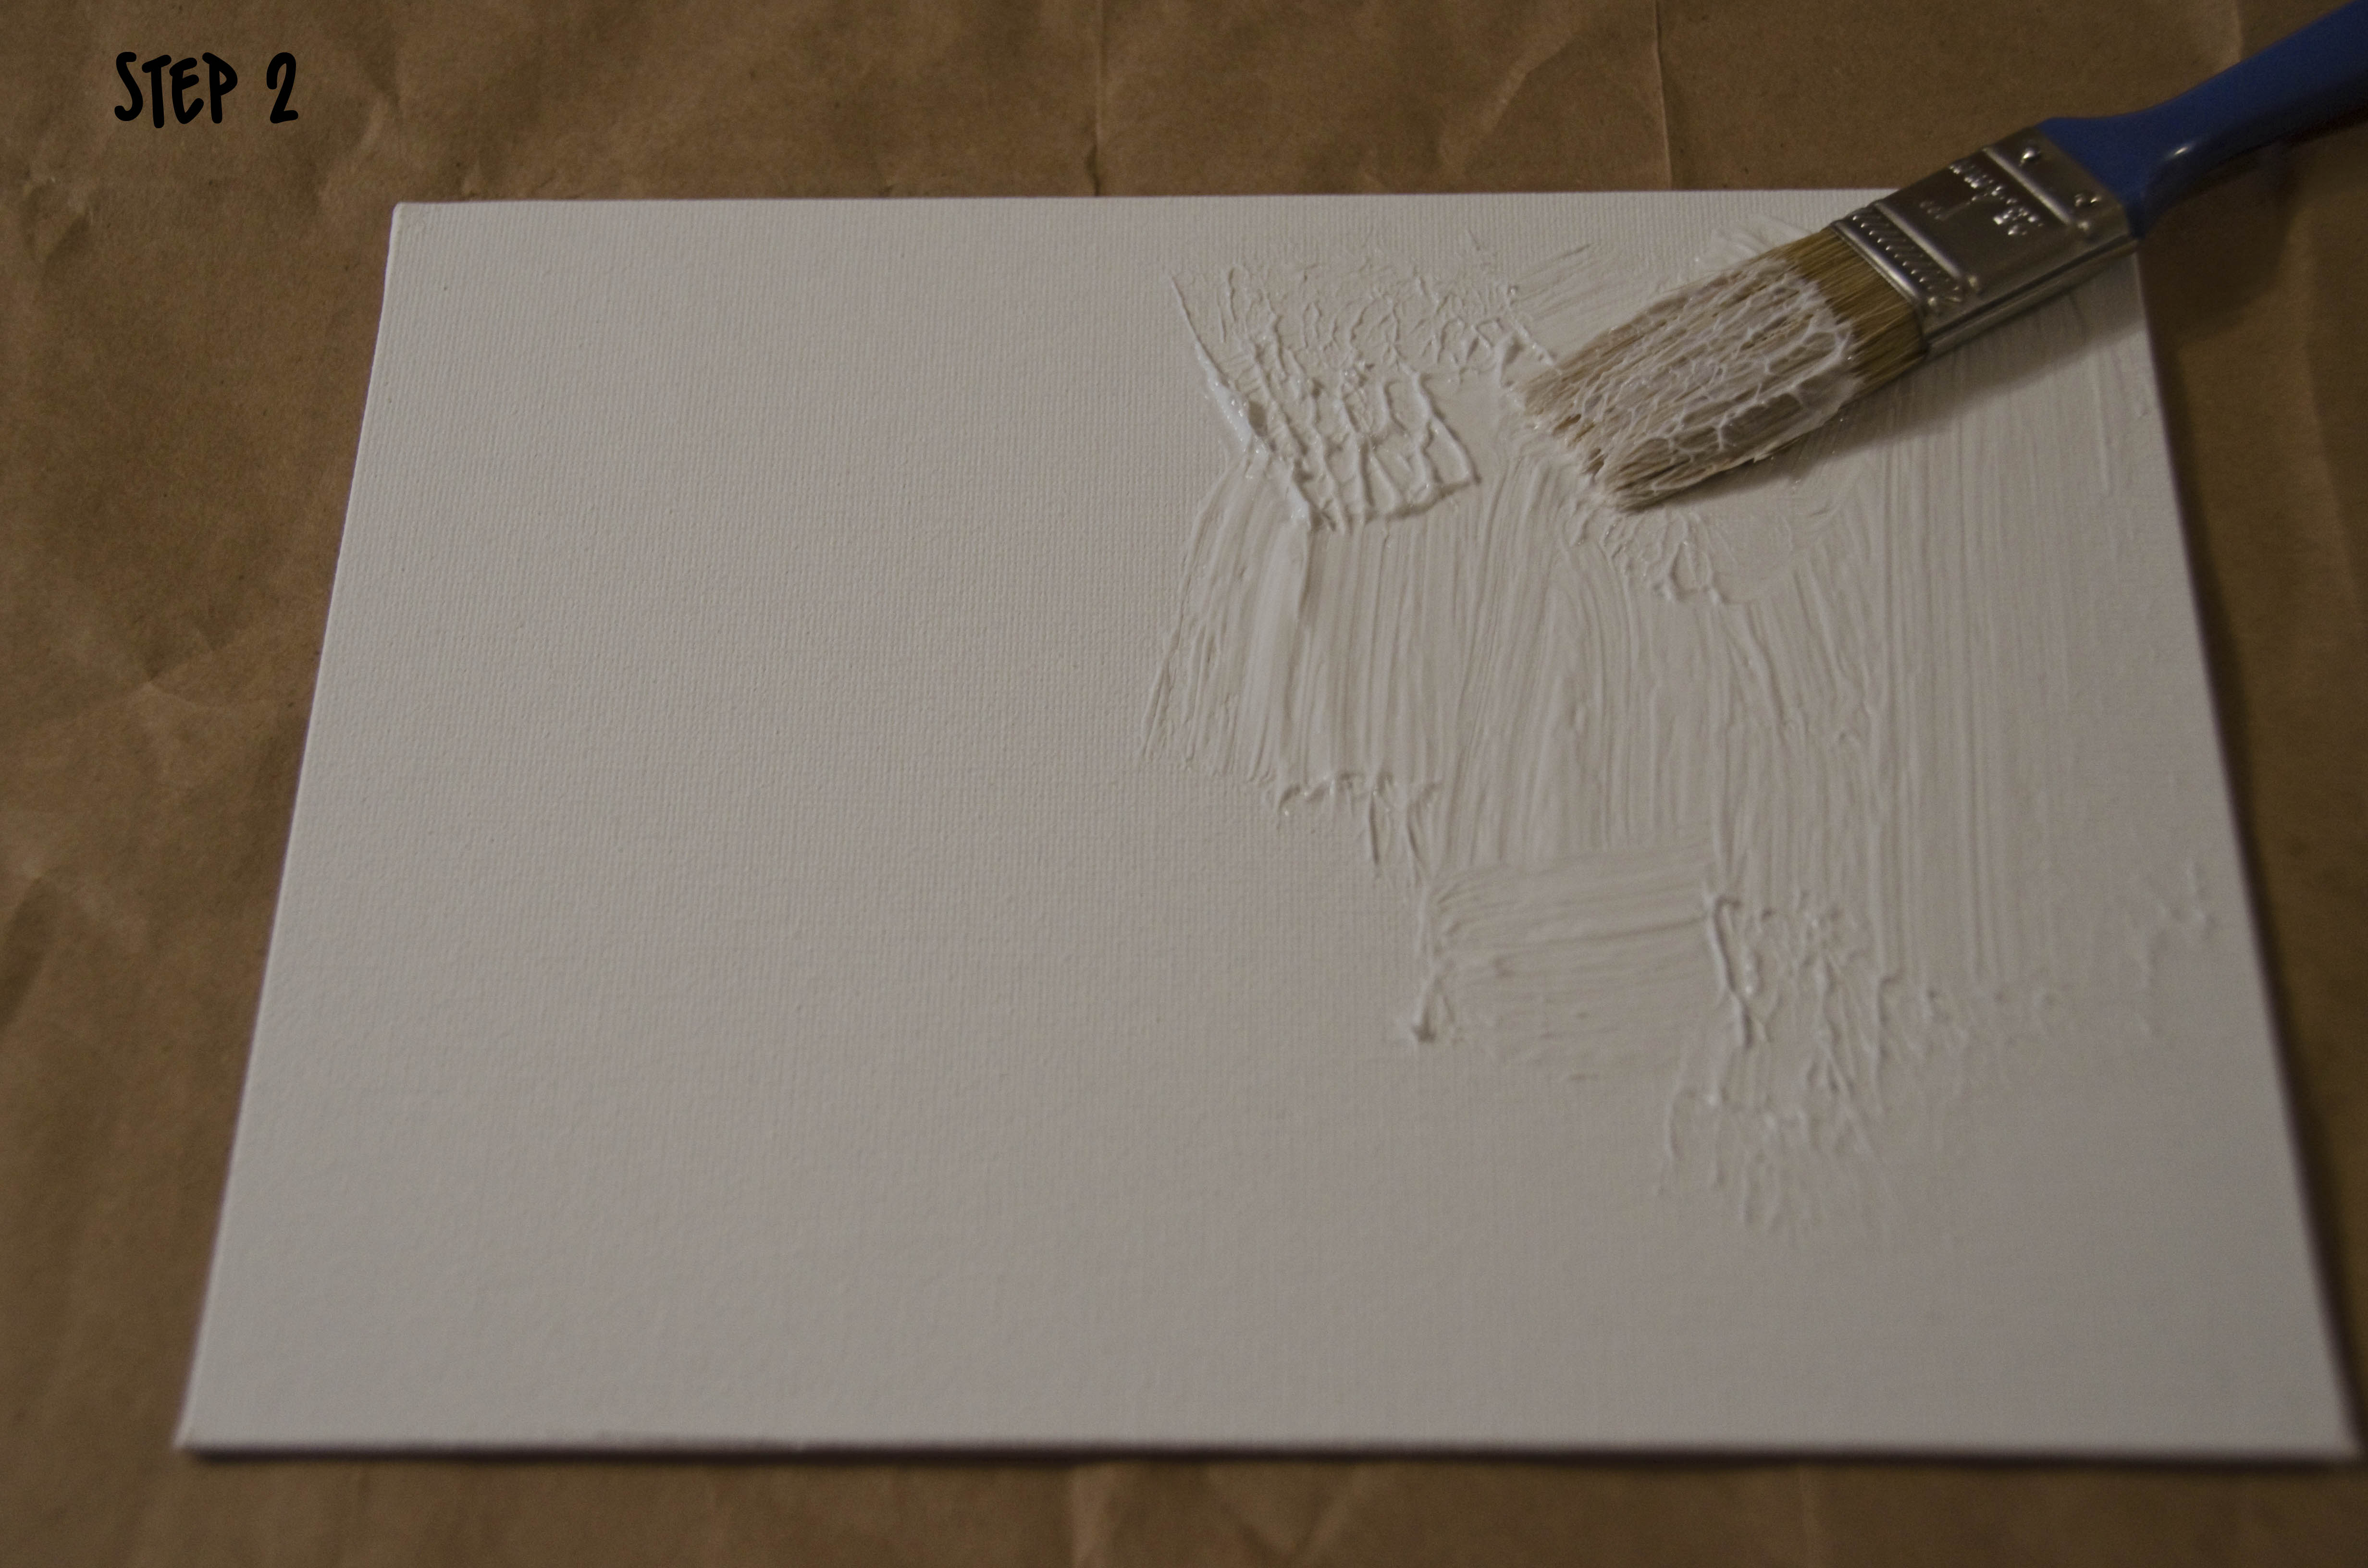
Step 2: Completely cover your canvas with a heavy coat of gel medium.
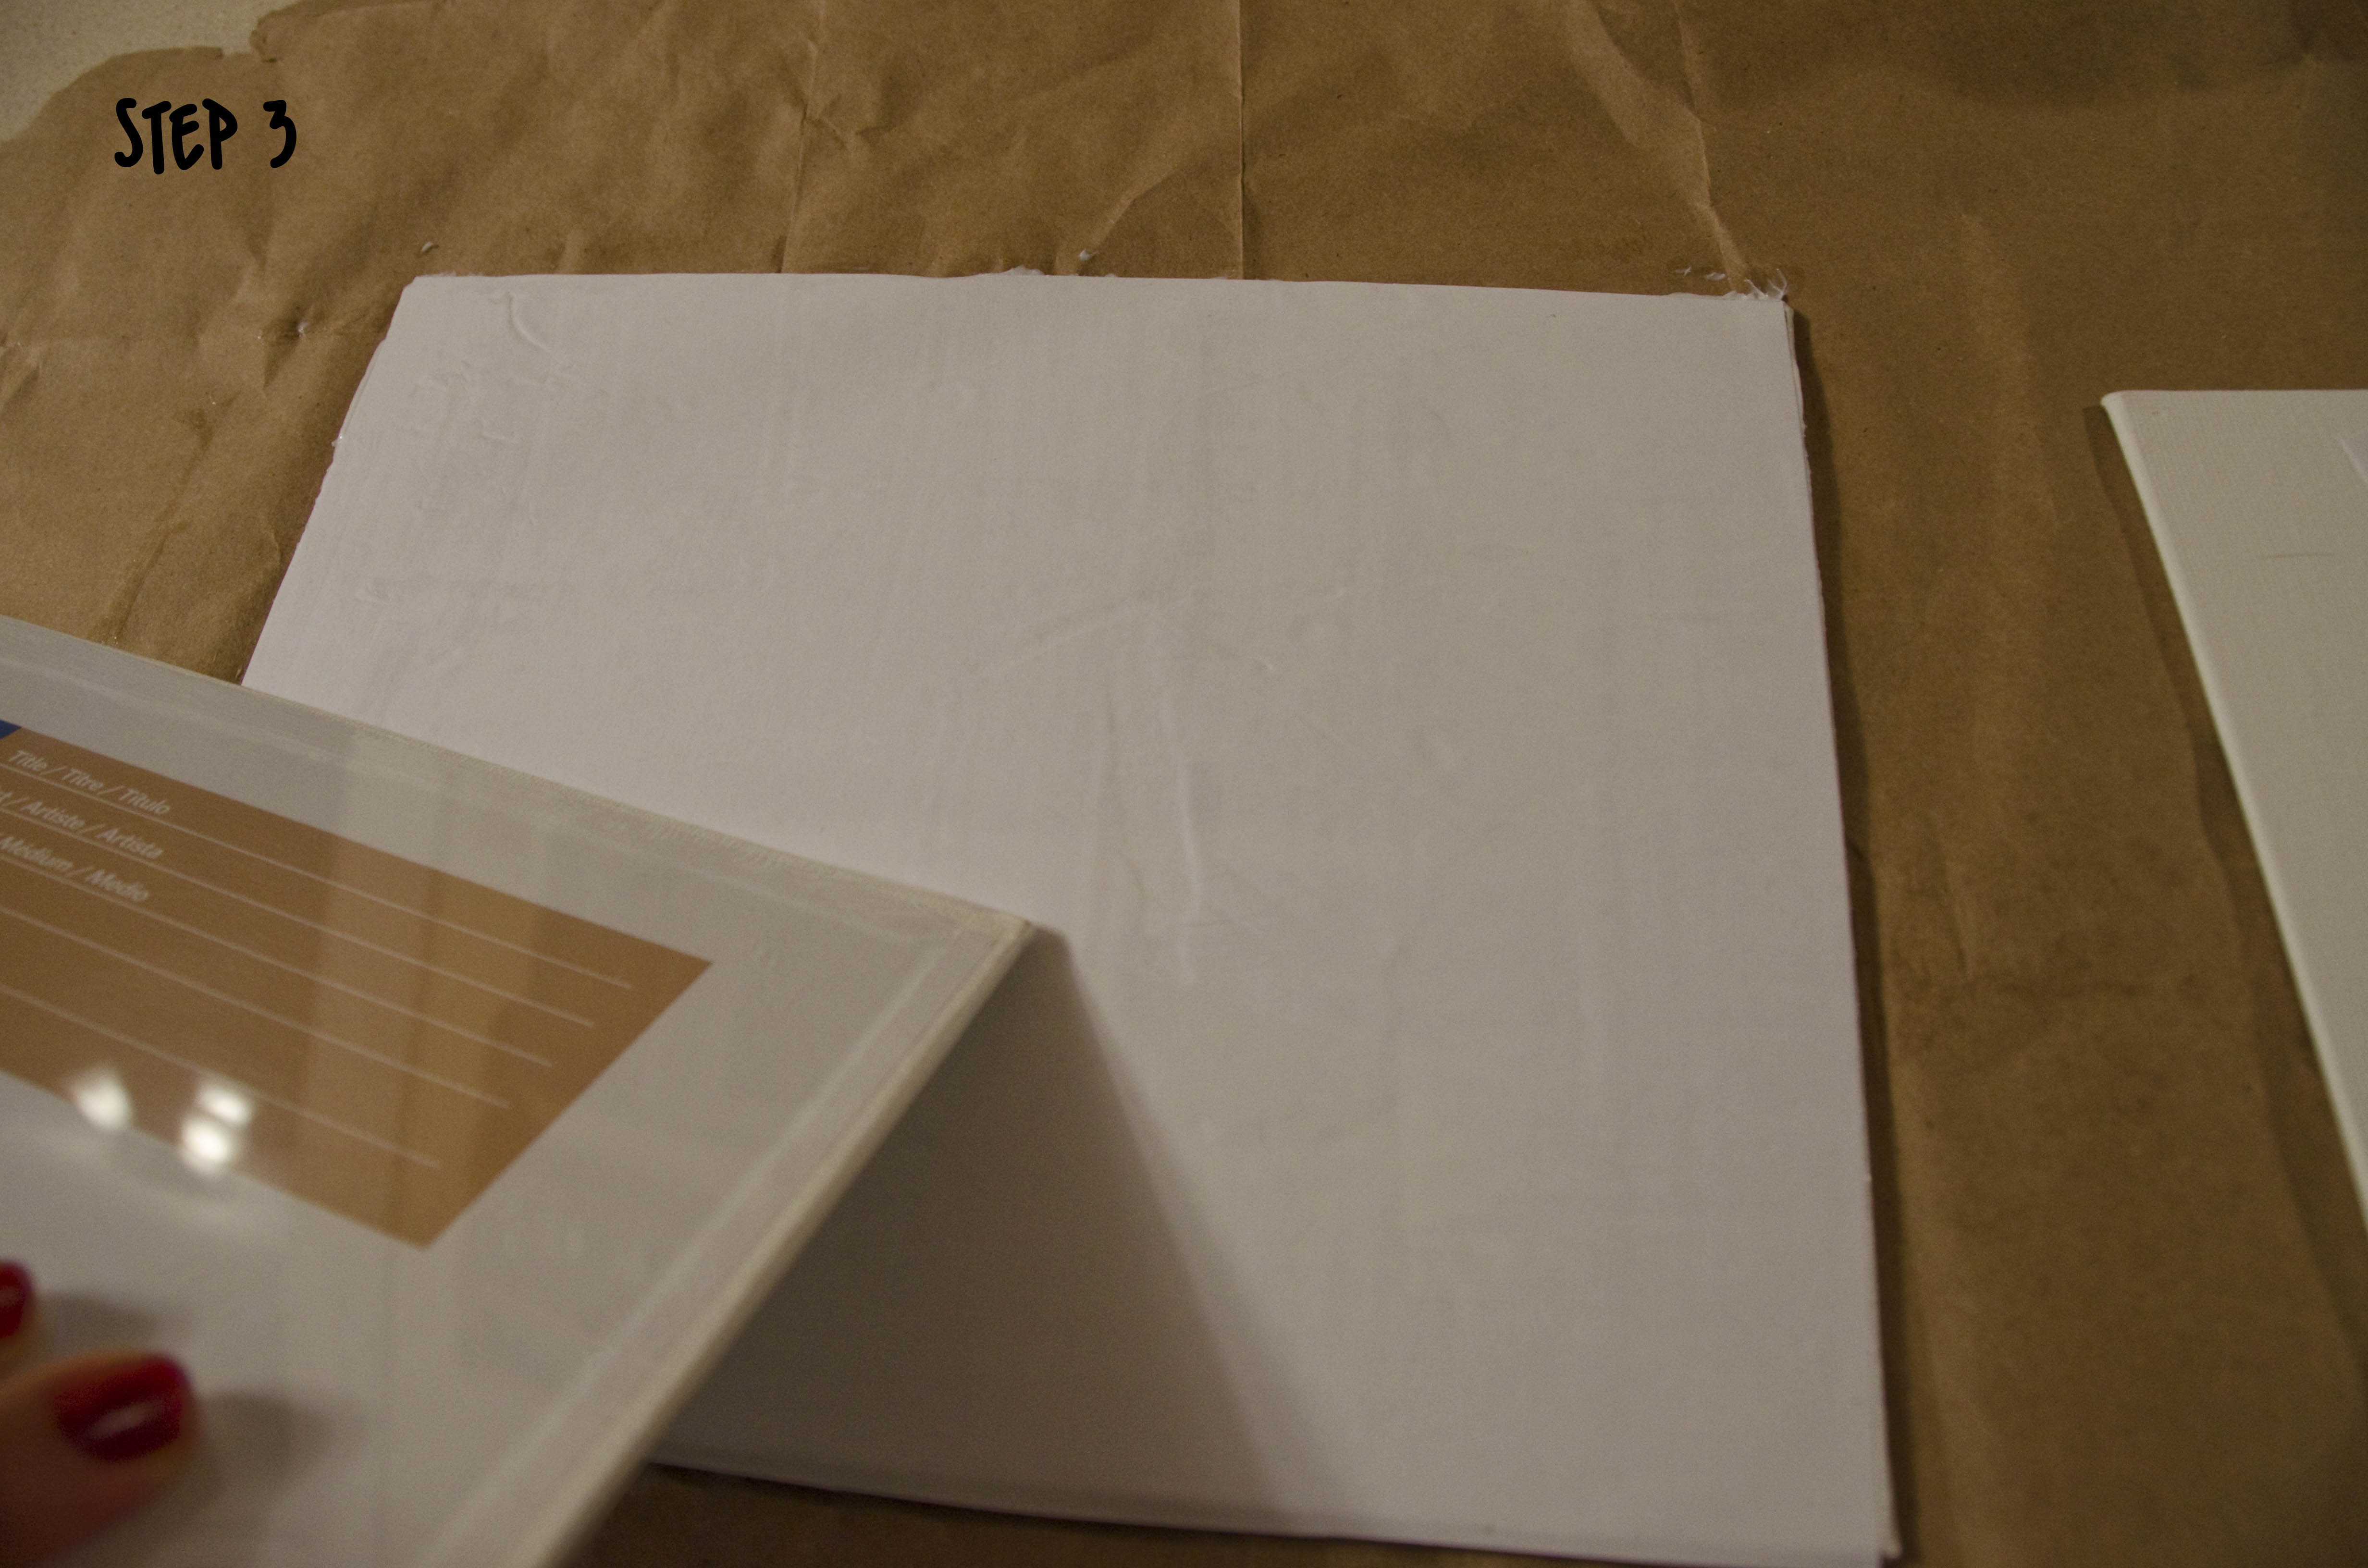
Step 3: Press the photo copy onto the canvas and let it dry completely.Make sure that you press it on really well and get all the air bubbles out. I went over it with another canvas board. Just leave the plastic wrap on the second board and rinse it off in the sink when you’re done. I let the color photo dry for about 3 hours, and left the black and white picture overnight as a test. I recommend overnight, or at least 6 hours. It came out much better and the paper was easier to peel without any of the transfer rubbing off.
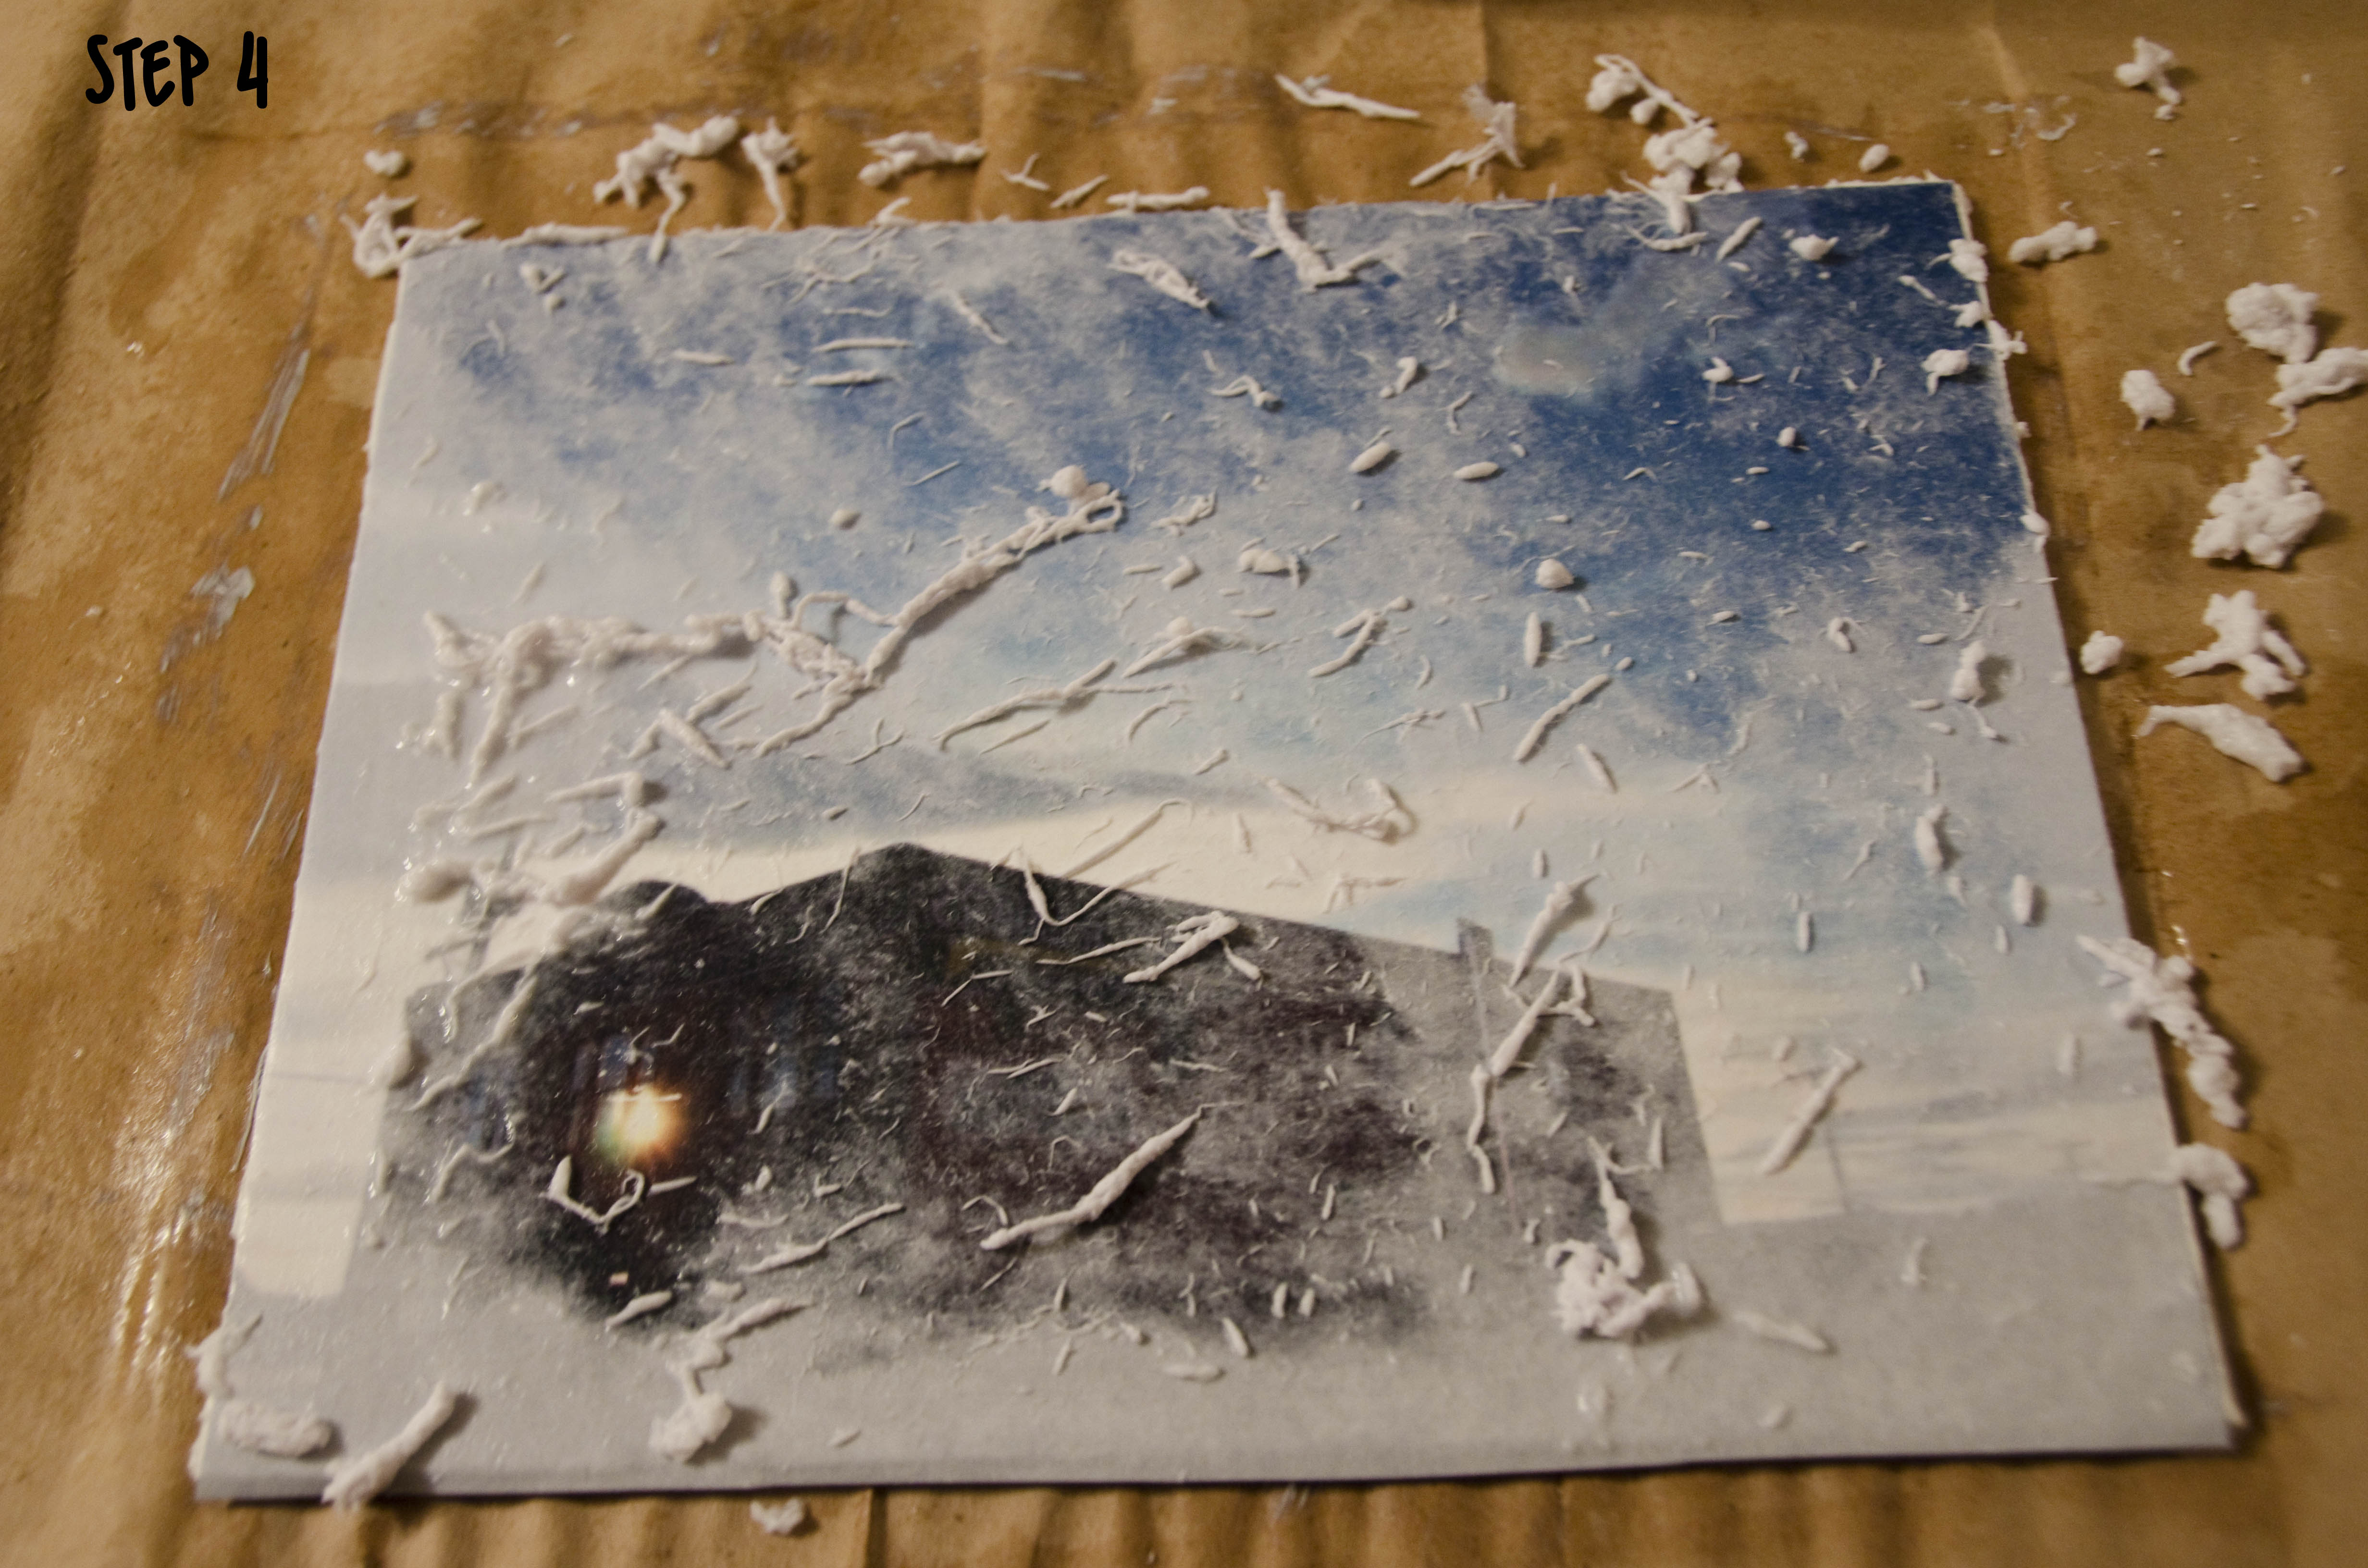
Step 4: After your image is completely dry, spray the top with water. Don’t be afraid to douse it. It really needs to get wet in order for the paper to become loose enough to start peeling off. Once it starts peeling, you can calm down with the water, though. You don’t want to totally soak the board and end up warping it.  Rub the surface so that pieces of the paper start to come off and your image is be revealed! Doesn’t it look cool to see the image coming through? This step takes a lot of patience. It took me about 15-20 minutes to gently rub the paper off. If you get overzealous, the transfer will rub off in little chunks and once its gone, there’s no putting it back on. You can see that this happened quite a bit on the color image. I was much more careful the second time around.
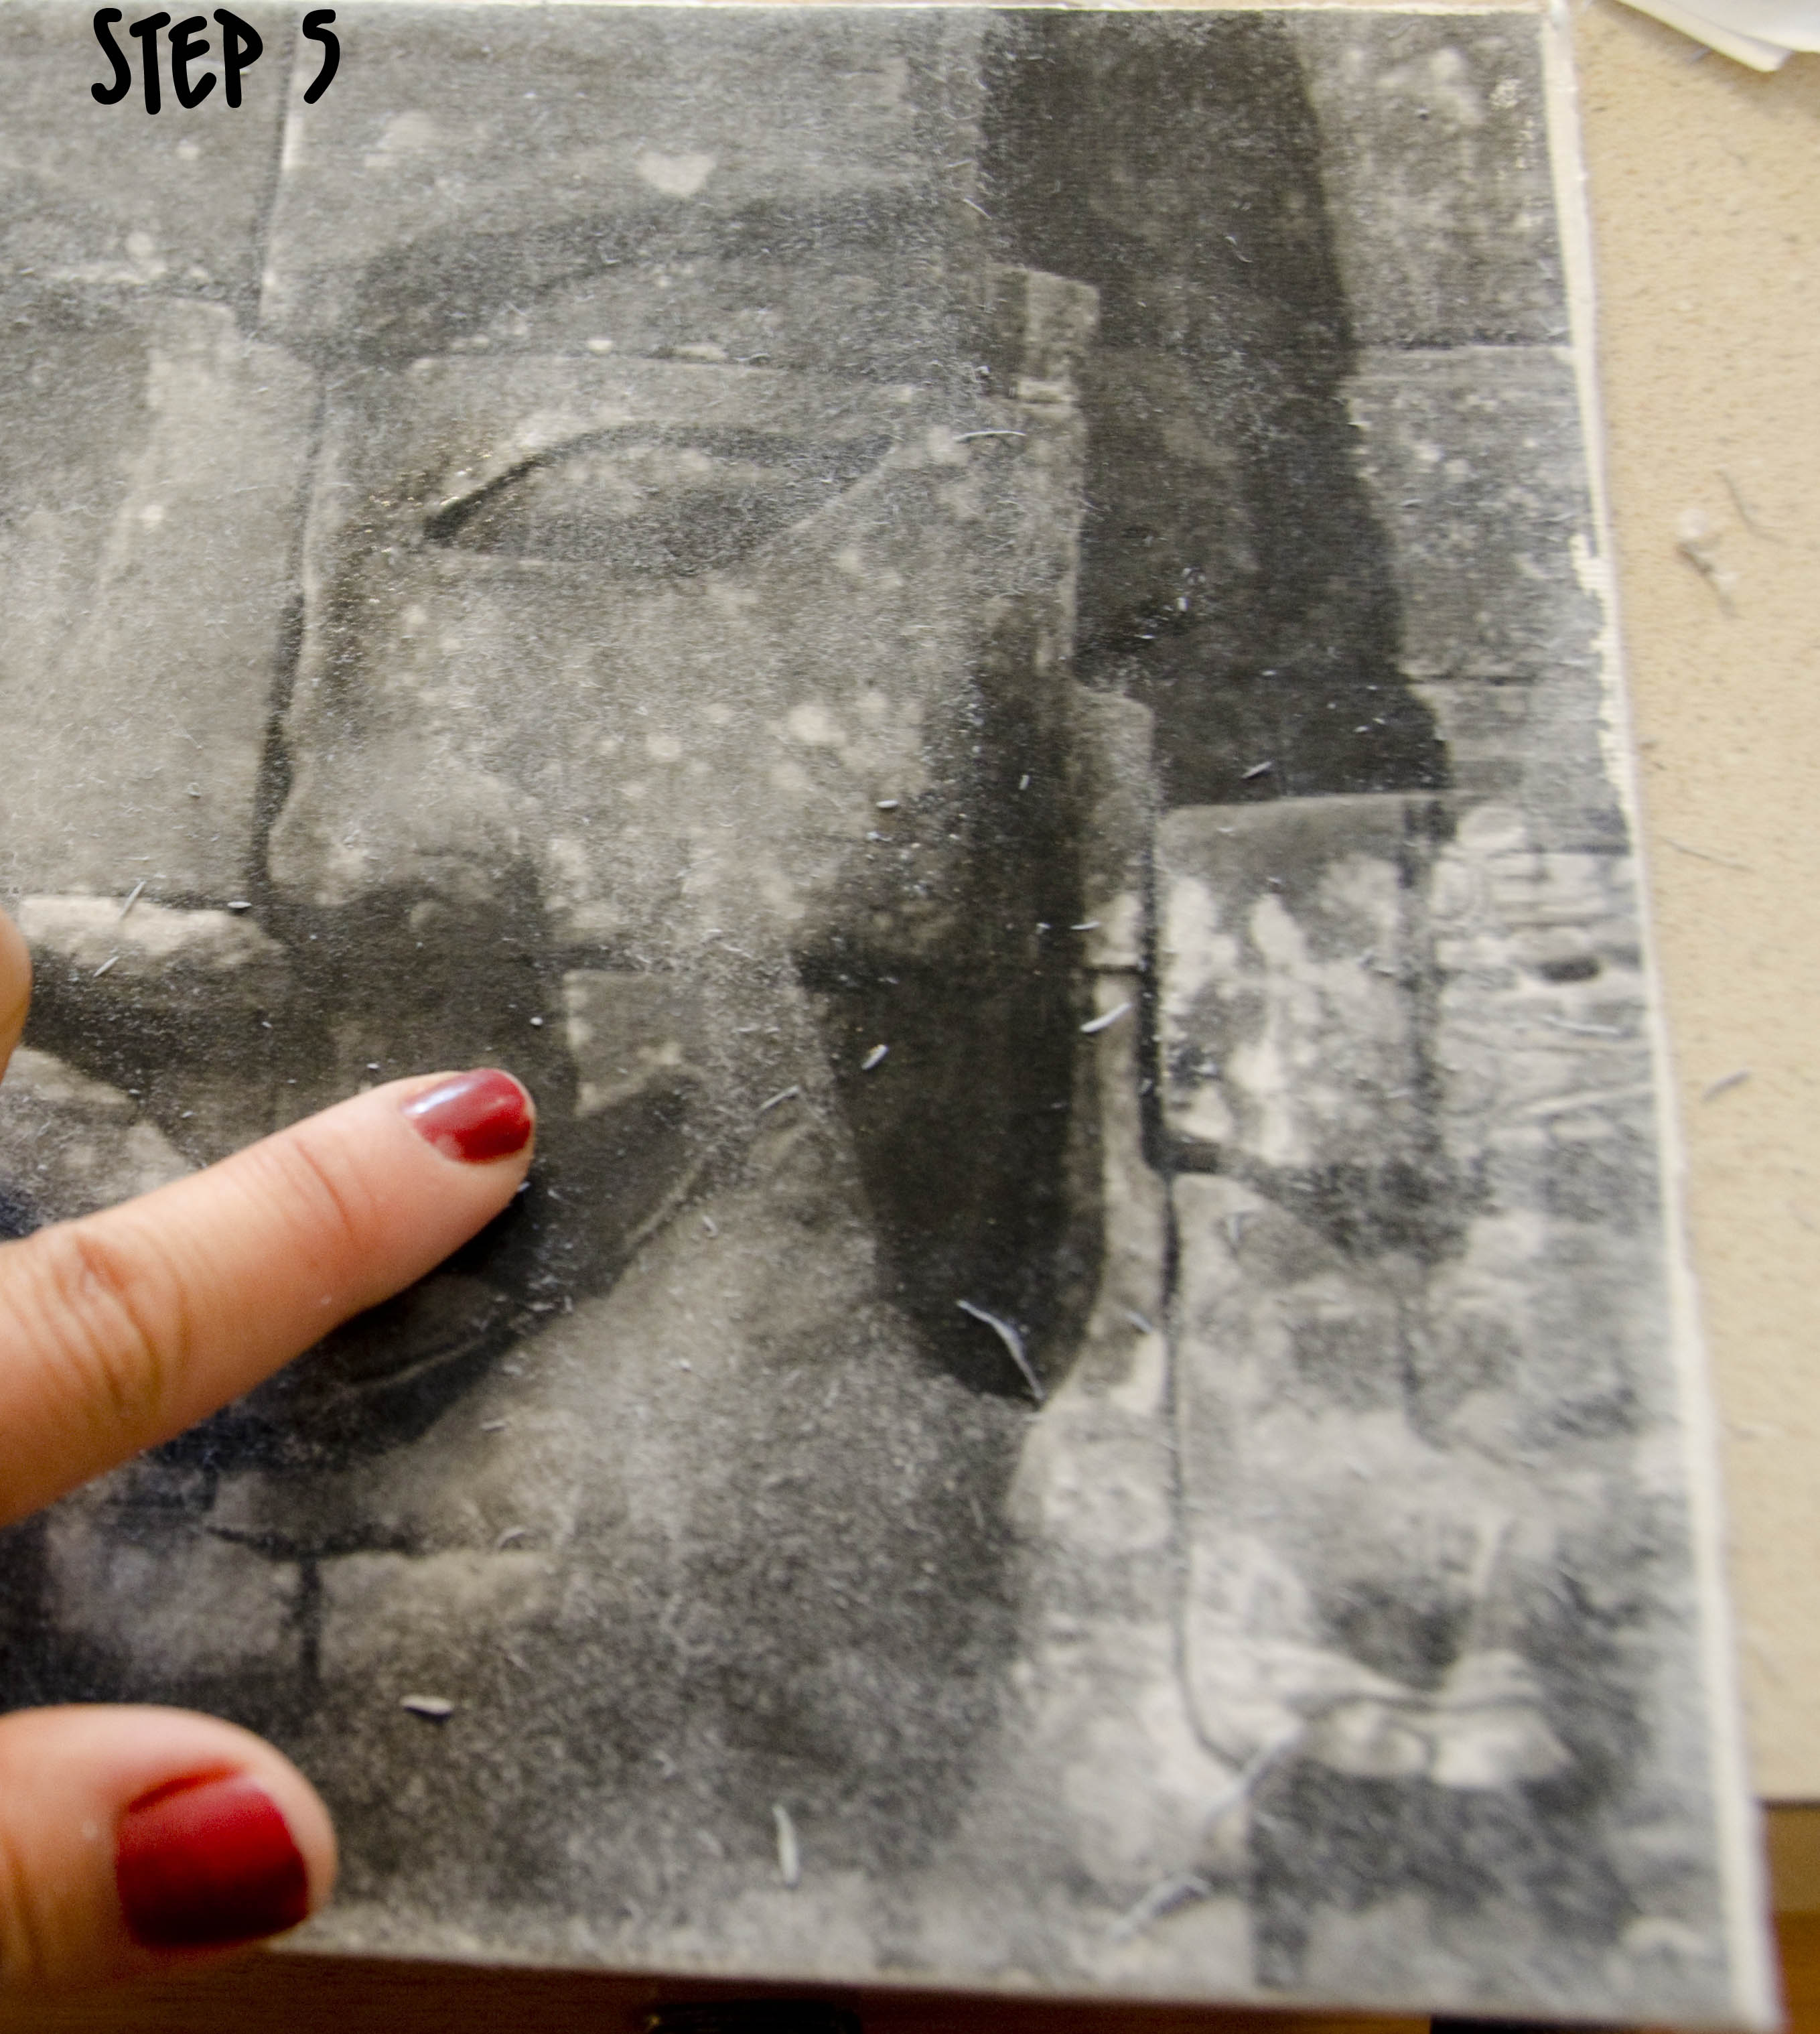
Step 5 Also, once you’ve gotten as much of the paper off as you can, you’ll notice that there is still a light film over the canvas that you can’t seem to remove, no matter how much you spray it. The trick here is to let it dry, then wet just your fingers and rub the dry board. The last bit will come off. Be very gentle! I didn’t do this with the color print and as you can see, it’s much hazier. However, this is kind of a cool “instagram-ey” effect if that’s what you want to go for. PS- you might as well take off any nail polish that you happen to be wearing beforebeginning this project- as you can see, it won’t be staying on for long….
Step 6: Cover canvas with one more light coat of gel to seal the image.
I’m really happy with the way these came out! I definitely plan on experimenting with this a lot more. Have fun!
~*~ Serenity
This is something I think Clicks should try... what do you think??